Wednesday, March 31, 2010

The nursery


Here is the home built nursery that has housed 4 generations of birds in the cold Oregon air... They stay warm and cozy under the red heat lights.

Dinner time


It's dinner time in the nursery

Tractor lessons!


Hunter did a great job learning to drive the tractor!

After tractor lessons


Relaxing after tractor lessons

Monday, March 29, 2010

More fencing....

Today is the day to finish hanging the wire on the new crossfence. Hopefully no surprises this time! I'll use the fence stretcher and tractor to get the wire as tight as possible without pulling the end TPosts out of the soft ground. This was an issue with the garden fencing but putting wood posts at the shallow end would be an even bigger issue due to the hardpan again.

So where's that dynamite????

Update: too much rain and wind.. no fencing yet. We'll try again tomorrow.

Update: 3/29/2010
There was finally a break in the rainy cold windy rain and snow so we were able to finish hanging the wire and gate.  I was able to stretch it more thant I expected, but alas.. the end post still started pulling out of the ground. I am attempting to use the metal brackets that make TPosts into corner posts with a brace. We had the same issue in the garden fencing though. Looks like these are not good to use in this soil without more bracing. Nevertheless, I was able to push the end post back into the ground with the tractor bucket and everything seems to be staying put now. Later I'll add another TPost right next to the end post and tie them together for more stability in the long run.

For now, the horses, llama, and last sheep are happily back in their side of the pasture , AWAY from my new fruit trees!

Upon closer inspection, there is some visible damage to the trrees, but hopefully not serious. Some bark missing here and there, several are missing top branches, and some mounds puched with holes. This was another valuable lesson!


Saturday, March 27, 2010

Fun with fencing

Today was the day to start installing the crossfencing in the pasture. This will allow us to seperate the land into 2 main sections, one for horses and the other for sheep. It will also make easier the subdivision of each section for proper pasture rotation and watering in the summer. Our chosen fence design is simple T-Posts with wire field fencing. To cross fence the entire pasture will require about 400 feet of wire and about 30 to 35 posts. Add to that at least 2 wooden posts cemented in for a strong end post and to hang the gate. Going into the project there is one fear. The ground here is very shallow. the "hardpan" layer is at times only a couple of inches below the topsoil, and this hardpan is virtually impenetratable. It takes at least 6 to 8 inches of depth to properly sink a T-Post, so we could run into problems.


Fortunately we placed all but 4 of the posts quite easily, sinking them deep enough without problem. But that leaves 4, near the creek. In fact 1 is near the bottom of the creek and still sitting underwater from recent rains. So off we go into the adventure of breaking hardpan. I am told that the traditional way of doing this involved plenty of dynamite. Obviously that isn't an option today, and heavy equipment is out of the question due to limited availailability and cost. So, we try eveerything else we can think of.


Round 1: Pickaxe


We start off the old fashioned way. Taking turns pounding the ground with a pickaxe. While this approach does look impressive, it is tough work and not very effective. After the first inch or so of hardpan the pick just bounced off the hardpan.


Round 2: The Posthole Digger

Next appraoch is to try the posthole digger with an extra-aggressive bit. While it digs produce a fine dust of drilled dry clay, there was just no appreciable progress. Perhaps what is needed is a little more down-pressure!


Round 3: Weight on the posthole digger


DO NOT EVER DO THIS! It is not smart, very dangerous, and besides.. it doesn't work. Even 2 men dont have enough weight to make any difference. What we need is a new, creative idea.....


Round 4: Hydraulics and a semi-sharp object:


So perhaps the a single fork on the end of the bucket will have enough force to break through...


                                                                                Or not.


No change.


Round 5: The Electric Drill?


Yes, a new and crazy idea... use an electric drill with a concrete bit to drill holes in the hardpan, and then break it loose with a pick-axe.
This idea actually worked fairly well. After the pain of laying 300 feet of extension cord, we were able to drill through the hardpan quite easily. Making 4 holes in a circle and hitting it with the pick allowed us to break a bit further. Problem is, this wont work well for the holes underwater in the creek, and it takes a LONG time and a lot of work with the axe. Is there a better idea?


Round 6: Getting to the point


While talking to my neighbor to see if he had a generator I could borrow, he came up with a new idea. He had the same problem, but got through it by cutting the end of the T-Post to a point with a plasma cutter and pounding them in. This sounded reasonable so why not?! I carried down 4 posts and he was good enough to cut them like he had done his. Before leaving, I borrowed the generator just in case this idea didn't work.


The post in the deepest ground benefited from this approach, and I was able to pound it just deep enough to hold. Unfortunately, the other 3 would not budge and the point just dulled... on goes the search for a solution.


Round 7: Success!


Believe it or not, this worked very well. What a setup! I borrowed a generator from the neighbor, which is stapped to the forks of the tractor. That drove the portable air compressor from my shop, which then powered a hand help air chip away at the hardpan quite easly. Even the holes in the water could be mostly emptied and then dug out this way. It took a while but wasn't particularly difficult.


We cemented the t-posts in the slighlty larger than necessary holes and they all ended up at about the right depth and height. I can't say whether this will last over time, but it seems sufficient.


Conclusion:


At the end of a very long day, we had the fence line in place. Once the cement hardens we can attach the wire. The question is whether my aching back will be ready in time!


Thursday, March 25, 2010

Lessons learned while planting the orchard

Today we learned the valuable lesson of keeping things in order and sticking to the schedule.

We decided to hurry and get the trees in the ground today due to a light rainstorm predicted for the next few days. We had the extra hands to help this week during spring break, and everything seemed perfect for the effort.

Unfortunately we forgot one detail.... we had not yet put in place the pasture fence that isolates the horses from the orchard. Samson, being the curious horse that he is, decided to check out the activities. Apparently the lightly flowering trees looked just too tasty to ignore, and he started munching on the top of a small pear tree.

Fortunately Kim arrived home from work just at that moment so she was able to walk Samson and Callie to the barn and saved the trees. There they will stay until we get the pasture fence in place.

In the future, we really need to stick to the schedule to avoid surprises!

The orchard is in!

Yesterday we finally planted the orchard. Hopefully we will have a small amount of fruit this year, but it's unlikely. The trees we planted were bareroot and smaller, not over 5 feet.

We are hoping they stay put. The ground chosen is less than ideal as it is very shallow in some places. We tried many methods to break through the hardpan but finally gave up. Instead we mounded each tree with a mixture of topsoil and compost (both purchased from Biomass1). Some of the mounds are sitting on as little as a foot of pasture dirt over the hardpan.


The orchard contains 22 trees. We went for a combination of fruits instead of many of any one. The list includes:
Persimmons
Apples
Peaches
Plums
Pears
Pomegranits
Figs
Apricots
Necterines
Cherries
And 1 mystery tree that wasn't labeled!

All of our trees came from the friendly and helpful folks at Shooting Star Nursery.

Tuesday, March 23, 2010

Finally we have a Blog!

This blog has been a long time in coming but here it is! It is hard to believe 2 years has already passed on this journey! We will try to post what has been missed over that time, but there is so much! Any posting that appear before this date are from "memory" and back dated as accurately as possible.

We will be using the website Pixel Pipes to make publishing pics and posts from mobile devices.

Saturday, March 20, 2010

Baby Chicks Arrived!

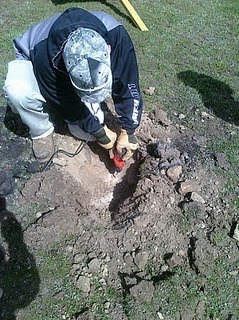
This years shipment of baby chicks has arrived at Rainey's Farm and Feed !

Unfortunately there was a shipping issue that delayed delivery by a couple of days, and that was a little more than some of the babies could take in the shipping box. We lost our ducks and a few of the chicks. The rest of the babies are healthy and happy to be in their new home, our home built bird nursery.


The kids are very happy to be able to finally hold them and feed them. We are committed to holding them on a daily basis, to get them used to human contact and keep them tame when we work with them. All of these birds are egg layers (except for the one rooster of course) and will be with us for a long time providing fresh healthy eggs for our farm.

Once they are a few weeks old and become "teenagers" these birds will be moved to the old turkey pen, safe but within eyesight to the existing flock. Hopefully this will ease the acceptance problems that birds have to newcomers.

Saturday, March 13, 2010

The little hummer that could

Ok, so sometimes things happen unexpectedly to those of us that don't really know what we are doing, but it ends up very fun!

We took delivery of the topsoil and compost for the new orchard. It arrived in a dump truck with an extra trailer, one full load of topsoil and one of compost. To save a lot of tractor time moving this stuff into position, I asked the driver to pull through the gate into the pasture and dump next to the new orchard site. The ground there is high and seemed firm enough. I stress "seemed".

First came the topsoil, he backed into the pasture with the full load and the ground shifted a bit under the weight, but not enough to be concerning. After dumping though... he tried to pull out to get the compost.  As he pulled through the gate, the front wheels dug down deep into the dirt and stuck tight. Both axles were spinning trying to push forward, but no budging.

We considered our options, which were limited since there was no tow hook on the front of the truck. We decided that maybe we could pull it back into the pasture and take a faster run through the gate. To do this I grabbed a chain and  attached between the tow hooks of the hummer and the truck. I managed to pull him back into the pasture about a foot but the truck stuck again, sinking even deeper. We decided to try to dig a "ramp" behind the front wheels to let them ease back up with an abrupt edge, and discovered a huge rock underground stuck behind the tire. That's what had prevented this first attempt from working. Unfortunately removing the rock didn't help, as the tires had sunk too deep by then and we were afraid any more attempts to go backwards would cause the front axle to dig into the ground.

At this point the driver called the office to ask for the front tow hooks to be sent out.  That way we could pull it forward.  While waiting for it to arrive, we dug ramps in the front of the front tires and filled in with gravel, making a sort of  gravel road leading back to ground level. We also shoveled gravel under the rear tires to gain traction.

When the hooks arrived, we brought the hummer around to the front, attached the chain, and off we go!  The first try was disappointing, but repositioning and setting the hummer in low 4wd, plus locked rear differential, and just flooring it.... worked. The big truck actually pulled up and out of the hole.  I wish we had a video of this!

After the truck was out my 7 year old son climbed into the ruts. It was so deep that the ground level was above his waist!

To test fate a little more, we filled in the ruts with large river rocks and gravel, and actually succeeded in backing the trailer load of compost over the ruts to dump the compost right past the gate. The ground was so soft by then that it was heaving up several inches all around the truck. But it didn't get stuck! He was able to dump his second load and drive out with only a little slipping.

After it was over.. I asked the driver what the weight of that truck was. He replied 17,000 pounds EMPTY. I can't believe we succeeded in pulling it out of a nearly 3 foot rut with a lonely H2! It is very unfortunate we don't have pics or video of this experience.. it was certainly a fun afternoon and a challenging experience!

Wednesday, March 10, 2010

The New Flock

The Breeder sent some pics of our soon to arrive flock of Jacob sheep. Most are newly born lambs this year who will arrive in mid april. The new flock consists of 2 nursing ewes, 6 lamb ewes, 1 lamb ram, and 1 wethered lamb.

Here they are!


The flock was purchased from Tom and Shannon at Kenleigh Acres Farm in Dexter, Or. Shannon is a registered Jacob Sheep breeder and both knowledgable and helpful.

Sunday, March 7, 2010

Turkey Processing Day

Today was the day to process our third flock of turkeys. These birds were all hatched on our farm and spent a healthy and happy 9 months running around like they owned the place! These are the last of the mixed breed between the original Narragansett tom and the Bourbon Red hens. Since we have decided to settle on the Narragansett breed exclusively, it was best to process all of the remaining birds.

We ended up with 11 birds, toms ranging from 13 to 18 lbs, and hens all about 8 lbs. They are now packaged, aged, and frozen in the freezer. The total was just over 110 lbs of meat.

For the next flock, we hope to have a vacuum sealer to remove more air from the bag and keep the meat fresher longer in the freezer.  Also, the processing equipment we use (belonging to the Southern Oregon Poultry Association) needs a sink somehow attached to the stainless steel table, and a foot valve to turn on and off the flow of water from the overhead sprinkler nozzle we built. The nozzle is nothing more than a short piece of hose with a garden nozzle with a gentle spray attached, and the whole thing hanging from a galvanized pipe extending from the top of a free standing pasture sprinkler. Ok, sounds weird but it was a last minute creation, and it surely did help! The foot valve and sink will be welcome additions for the next go round at Thanksgiving or Christmas.